DIY Tower Bridge 3D Wooden Puzzle Kit with LED Glow
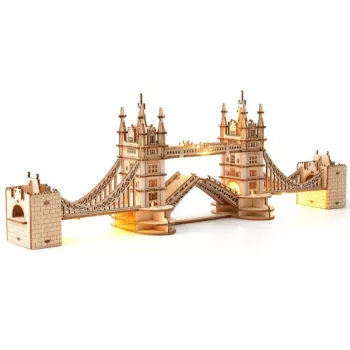
DIY Tower Bridge 3D Wooden Puzzle Kit with LED Light: Build, Light, and Display a London Icon
A buildable landmark that doubles as a display piece: this DIY Tower Bridge 3D wooden puzzle kit combines laser-cut style wooden parts with an LED lighting feature for a finished model that looks great on a shelf, desk, or nightstand. It’s a hands-on project for hobbyists, families, and gift-givers who want an activity that ends with a decorative result.
Inspired by one of London’s most recognizable structures, Tower Bridge, the model brings a little “mini architecture” energy into everyday spaces. For real-world context on the landmark itself, see the Tower Bridge official site.
What makes this Tower Bridge model special
- Iconic architecture-inspired design that stands out as décor after assembly.
- 3D wooden construction that feels like crafting and puzzling at the same time—satisfying to build, easy to admire once finished.
- LED light feature adds a warm, display-ready finish for evenings and low-light rooms.
- Giftable concept for birthdays, holidays, and hobby milestones—an experience plus a keepsake.
Quick overview at a glance
- Best for: makers, puzzle fans, teens and adults (with supervision for younger builders).
- Great occasions: rainy-day activity, weekend project, screen-free family time, gifting.
- Display idea: bookshelf centerpiece, office backdrop, nightstand accent with soft lighting.
Build & display checklist
| Topic | What to consider |
|---|---|
| Workspace | Clear table space, good lighting, a tray for small parts |
| Time | Set aside an uninterrupted session or split into stages |
| Tools | Typically only simple household items (see prep section) |
| Lighting | Plan where the model will sit so the LED effect is visible |
| Care | Keep away from moisture and direct heat sources |
Unboxing and preparation
A smoother build starts before the first piece clicks into place. A few minutes of setup can prevent most “where does this go?” moments later.
- Sort pieces by size/shape before starting to reduce mid-build searching (especially helpful when similar parts look nearly identical).
- Read through the instruction steps once to understand the build sequence and spot any steps where you’ll want extra space or attention.
- Test-fit pieces gently before applying pressure; wooden tabs can be snug, and a careful approach helps prevent splitting.
- Keep LED components together in a small bowl so they don’t get misplaced while you focus on the structure.
Optional but handy: tweezers for small details, a nail file or fine sandpaper for tight tabs, and a small tray or lid to hold the smallest parts.
Step-by-step build flow (simple and stress-free)
Most builders enjoy this kit more when they treat it like a calm, staged project rather than a race. If you’re building with family, assign roles: one person sorts and hands pieces, another assembles, and a third checks the instructions.
- Stage 1: Assemble the base and main structural sections for stability. This creates a dependable “foundation” so later parts align more easily.
- Stage 2: Add bridge details and architectural accents in the recommended order. Decorative pieces often lock other components in place.
- Stage 3: Install the LED light component(s) when the interior/exposed paths are accessible. This is usually the point where routing and placement are simplest.
- Stage 4: Finish with outer panels and final alignment checks. Small shifts early can show up as gaps later, so pause and verify fit.
- Stage 5: Do a gentle stability test and a final visual pass for gaps or mis-seated tabs, then tidy the display area and enjoy the glow.
Tips for a cleaner finish
LED light setup and display ideas
Care, storage, and safety notes
- Keep the model dry; wood can warp if exposed to moisture.
- Dust with a soft brush or microfiber cloth—avoid wet wipes or sprays that can soak seams.
- Store leftover parts and instructions in a labeled envelope for future repairs or re-seating pieces after a move.
- If the kit uses batteries, follow basic battery safety (proper orientation, keep away from small children, remove for long-term storage). For general guidance, refer to the CPSC battery safety resource.
Product options available now
- DIY Tower Bridge 3D Wooden Puzzle Kit with LED Light — a ready-to-build model that fits crafting sessions and décor-minded gifting (currently $13.51).
- Outlet Secrets: How to Score the Best Deals on Amazon — a digital guide to help stretch your hobby and gift budget when you’re shopping for more build kits, desk décor, or tools (currently $6.99).
- Unlocking Savings Secrets — Master Your Deal Hunting Routine — a routine-based approach for finding better prices over time, useful for anyone collecting puzzles and DIY builds (currently $8.99).
FAQ
How long does it take to build a 3D wooden Tower Bridge puzzle?
Most builders can expect a few hours, depending on experience and how much time is spent sorting parts first. If you split it into stages, it’s easy to complete across an evening and a follow-up session.
Do I need glue or special tools for a wooden puzzle kit like this?
Many wooden model kits are designed with tab-and-slot assembly, so glue often isn’t required. Simple helpers like tweezers, a small tray for parts, and a nail file or fine sandpaper can make the build smoother—always follow the included instructions.
Is the LED light safe to leave on for display?
Use the light as directed, and turn it off when unattended or when you’re away from home. Keep the model away from flammable materials, and follow standard battery safety practices if batteries are used.








Leave a comment